The February 2011 Daring Bakers’ challenge was hosted by Mallory from A Sofa in the Kitchen. She chose to challenge everyone to make Panna Cotta from a Giada De Laurentiis recipe and Nestle Florentine Cookies.
This was the perfect time for panna cotta. I don't know about you, but February was a blur for me, went by so quickly, without a whole lotta time to spend in the kitchen making desserts. So, I was happy to see this challenge. Panna Cotta is S.I.M.P.L.E. Not only that, it's really good. And, it's flexible, you can do whatever you want with it. And, last of all, it's jiggly!
Panna Cotta literally means "cooked cream." Which is what it is. Panna cotta is usually made up of a few ingredients: milk, cream, sugar and gelatin.
Ingredients
1 cup milk
1 tablespoon gelatin
3 cups cream
1/3 cup honey
1 tablespoon sugar
pinch of salt
Directions:
1. Pour the milk into a bowl and sprinkle gelatin evenly and thinly over the milk and let stand for 5 minutes to soften.
2. Pour the milk into a saucepan and heat over medium heat until hot, but not boiling, about five minutes.
3. Add cream, honey, sugar, and salt. Making sure the mixture doesn't boil, continue to heat and stir occasionally until the sugar and honey have dissolved 5-7 minutes.
4. Remove from heat, allow to cool slightly then pour into glass, ramekin or mold. 5. Refrigerate at least 6 hours or overnight.
VARIATION: Add a tablespoon or two of espresso powder to the warm mixture (I DID!)
After I made the mixture, I poured it into the ramekins and let them set over night. To finish the dessert, I made a small batch of coffee gelee, just a little coffee, some sugar, some gelatin and let it cool to room temp, then poured in the last 1/8 inch of the ramekin. Once set, run a knife along the edge, and turn upside down on a plate. You can garnish with some chopped hazelnuts. Enjoy!
Friday, February 25, 2011
Saturday, January 22, 2011
January Daring Baker's Challenge - Biscuit joconde and entremets
The January 2011 Daring Bakers’ challenge was hosted by Astheroshe of the blog accro. She chose to challenge everyone to make a Biscuit Joconde Imprime to wrap around an Entremets dessert.
A joconde imprime (French Baking term) is a decorative design baked into a light sponge cake which lends an elegant finish to desserts formed in molds. A joconde batter is used because it bakes into a moist, flexible cake. The cake batter may be tinted or marbleized for a further decorative effect. You can even use color!
The joconde batter is spread very thinly and then baked on high heat for a short time. It must be watched carefully so that it stays flexible enough to fit into the molds. If under baked, it will be sticky. If over baked, it will dry out and crack. Once cooled, the sponge may be cut into strips to line any shape ring mold.
Entremet is a French term used to describe an ornate dessert with many different layers in a mold, usually served cold. Usually the layers are mousses or bavarians, but other components (such as meringue for crunch or gelee to add texture) can be added. A glaze often tops it off.
What a challenge it was! I have to say that this is the most "daring" thing I've baked since going to pastry school... I'll make sure to tell you about all of my screw-ups, as well as lessons learned (at the end), so you can hopefully learn from my mistakes.
The first part challenge was figuring out what flavors to use. Since the joconde itself is made from almond flour/meal, I decided to choose flavors that would compliment almond. Not too hard, since nearly everything tastes great with almond. Eventually, I decided on a base of dacquoise (a crunchy baked almond meringue), alternating layers of chocolate and almond mousse, along with a raspberry gelee layer in the very center. I used a raspberry glaze for the top.
Since the dacquoise takes the longest to prepare (it has to bake for 2 hours), I decided to make that first.
1 T unsalted butter, softened
1/4 cup all-purpose flour
1 cup almond meal
1/2 cup sugar
3/4 cup powdered sugar
4 large egg whites
Heat oven to 200 degrees. Line a baking sheet with parchment paper. Brush with 1 tablespoon butter; coat with flour. Set aside. Whisk together the almond meal, 1/4 cup sugar, and the powdered sugar; set aside. Beat the egg whites until they form soft peaks. One tablespoon at a time, slowly add remaining 1/4 cup sugar and continue to beat to stiff peaks. Fold in the nut mixture. Spread the mixture onto the prepared baking sheet until it is 1/4 inch thick. Bake the dacquoise 2 hours then turn off the oven, and leave inside until completely cooled, about 30 minutes.
Once this was done, I decided to make my gelee, since it too takes some time to set. A gelee, especially one spread this thinly, is a fancy word for what is basically a grown-up fruit roll-up.
Raspberry Gelee
1 1/2 tsp gelatin powder
1 T cold water
1 cup frozen raspberry
3/4 oz superfine sugar
Sprinkle the gelatin over the cold water to bloom. Cook raspberries and sugar on the stove to dissolve the sugar, then blend in a blender. (You can strain to remove the seeds, but I like 'em in there.) Heat the gelatin until liquid (careful, this happens fast!), then mix into the raspberries. Pour the mixture into your cake pan set over a piece of plastic wrap, then allow to set for at least 2 hours.

Once this was in the fridge setting, I decided to mix up my joconde batter and decor paste.
Joconde
3oz almond flour/meal
2⅔ oz confectioners' sugar
1 oz cake flour
3 large eggs
3 large egg whites
⅓ oz sugar
1 oz unsalted butter, melted
In a clean mixing bowl, whip the egg whites and sugar to firm, glossy peeks. In a separate bowl, sift almond flour, confectioner’s sugar, cake flour. On medium speed, add the eggs a little at a time. Mix well after each addition. Mix until smooth and light. Fold in one third reserved whipped egg whites to almond mixture to lighten the batter. Fold in remaining whipped egg whites. Do not over mix. Fold in melted butter.


Cocoa Joconde-Décor Paste
7 oz unsalted butter, softened
7 oz confectioner's sugar
7 large egg whites
6 oz cake flour
2 oz cocoa powder
Cream butter and sugar until light and fluffy. Add egg whites, beating continuously. Sift together flour and cocoa powder, then fold the mixture into the butter/sugar/egg mixture.
 For those of you who don't already know this about me, I never waste an egg white or a yolk. All those egg whites we just whipped up produced a bunch of egg yolks that can be used for something. And....guess what? Each batch of mousse filling requires 6 yolks. And, even if we weren't making mousse, we COULD make mousse or we could make ice cream. Or creme brulee. This list goes on. You probably have NO idea how easy any of these three things are to make.
To make the joconde imprime (the "patterned joconde"), create a pattern out of decor paste, on a flat baking sheet with silicone mat. You can spread a thin layer of the decor paste and then use a spatula, decorating comb or even your finger to make a pattern. Or you can use a piping bag full of the decor paste to pipe your own design on the mat. Keep in mind the height of your mold and how wide your patterned strips are going to need to be. I decided to use the piping bag and piped designs similar to those that are usually done in melted chocolate. Once your design is finished, put the whole baking sheet in the freezer for about 15-30 minutes to harden up.
At this point, I decided to revisit my dacquoise and cut it to fit my entremet. What I didn't realize is that a rectangular meringue (this one anyway) is way too crisp to be cut into any kind of even-close-to-circular shape. So, when I tried, it basically just shattered into various sides shards of sugary, eggy, nutty goodness. I ate a few of the scraps, then tossed the rest in the trash and tried to decide what to do next. Hmmmm...I think I will make ANOTHER dacquoise, this time in the springform pan, so that when I remove it, it will be the perfect size/shape for the bottom of the cake. So, I set my joconde batter aside, left my patterned decor paste in the freezer, hardening, and whipped up another batch of that dacquoise. While it was in the oven for 2 MORE HOURS, I decided to take a break and go for a long run. So that I didn't have to wait for it to finish cooking, I asked Todd (my husband) to turn the oven off when the timer went off. One of the nice things about this dacquoise is that there really isn't any need to adjust baking time. After 2 hours, it's done, and it just cools in the hot oven. So, when I came back from my run, the pretty circular dacquoise was finished and cool in the oven. I decided to leave it there (***) and go take a shower. Ahhhhhhhhhhhhh, all clean. Well, at this point, the joconde batter I'd made HOURS ago was deflating (remember all those whipped egg whites that were folded in, as well as the melted butter? There is only so long that can sit, even in the fridge), so I decided to make another batch. When it was done, I cranked up the oven to 475 to preheat for my joconde, pulled the patterns out of the freezer and then...
I STOPPED. WHAT IS THAT SMELL? WHERE IS THAT SMOKE COMING FROM?
IT'S COMING FROM THE OVEN, inside which the pretty, circular dacquoise is still sitting. Burned to a *&$&*(# crisp at this point!!! I had completely forgotten to take it out before preheating my oven!!! Now, a second 2+ hour dacquoise ruined. I decided the entremet was going to have to go without.
Once I'd aired out the kitchen, I pulled the baking sheet with my patterned decor paste out of the freezer (it was nice and hard by now!) and spread a layer of the joconde batter on top . (Since the pattern is frozen hard, it shouldn't move at all.) Try to keep the joconde batter at a consistent height across the baking sheet, 1/4" is good. Bake in that hot, hot, 475 degree oven for 7-15 minutes, depending on the thickness of your batter. (Mine was fairly thin, so it baked on the lower end of that range.) Remove, cool slightly on the pan, and then quickly flip onto a kitchen towel or parchment paper sprinkled generously with powdered sugar. (This keeps the back of the cake from sticking.)

Once it's cooled a little more, trim the edges with a sharp knife (and a straight edge/ruler) to fit the inside of your mold. Remember, I used the springform pan (the kind you normally use to bake cheesecake in), so once it was cleaned of the blackened dacquoise, I went to prepare the pan. Place a piece of parchment paper on a solid surface (cookie sheet, cutting board, cookbook, whatever) and top with a piece of plastic wrap. Put your ring mold or springform pan on the plastic wrap and then snugly bring the plastic up the sides so that the bottom of the pan is taut. I also used a rubber band around the bottom edge to keep the plastic in place. Cut a piece of either parchment paper or acetate strip to line the inside of your pan. You probably should measure and cut it to be a little higher than the top of the pan, but then trim to the edge of the pan once it's lining the inside. This will help you smooth the top of your entremet.
Now, press your cut cake strips into the inside of the mold, decorative side facing out. Push and press the ends together so that the cake lining the mold is seamless. You don't want any of that yummy mousse and stuff sneaking out! If you want to cut a circle of joconde to press inside the middle to be the "bottom" of your entremet, you can do that now. I did decide to to do that since I didn't have any other plans for the bottom once dacquoise #2 got trashed.
Now, time to fill that thing! Remember above, I said I was filling with alternating layers of chocolate and almond mousse, as well as that grown-up fruit roll-up ("raspberry gelee") in the center. I whipped those mousses up in a snap and got to work filling that pan.
Chocolate Mousse
Place 12 oz chopped semisweet chocolate in a double-boiler (or a metal bowl set over a pan of simmering water). Add 4 oz butter. Careful not to scorch, melt the mixture until smooth. In another metal bowl, whip 6 egg yolks, add 3 oz sugar, an ounce or two of liquor if you want, and whisk over that pan of simmering water until it's almost too hot for you to stand it when you put your finger in. Move the metal bowl to a mixer and whisk on high until cool. (Since this takes a while, you might want to do that in your mixer bowl so you can just set it and forget it. For a few minutes.) When it's cool, it should be nice and thick. In a separate bowl, whip 1 pint (= 2 cups) of heavy cream to soft peaks. Fold the chocolate/butter mixture into the egg mixture, then gently fold in cream until no streaks remain. DO NOT OVERMIX or you will deflate. Refrigerate to set.
Almond Mousse
Now, I had never made almond mousse before, nor did I have a recipe. But, I did buy a really nice, gourmet, imported almond paste from Southern Season just for this occasion, so I had to ad lib. NOTE: It did not go as planned...Prepare the egg, sugar and liquor (if you want) mixture as above. For those of you taking notes, this is called a "sabayon" in French pastry terms. I tried softening the almond paste some by heating it in the microwave and then used a fork to try to soften it some more. When folding ingredients into each other for a mousse such as this, you really want the two components to be of similar consistency. This allows them to blend nicely. These two things did not blend nicely. The almond paste never got "smooth" and there were little chunks throughout the mixture. Plus, it was so much stiffer than the sabayon that I deflated a lot of it when mixing them. Once mixed, I folded in a pint of whipped cream (soft peaks) and refrigerated. Even though it had little almond paste chunks in it, it still tasted good!
To assemble, I spread a thin layer of chocolate mousse (about 1/2"), then almond mousse, then flipped the set gelee on top, then another layer each of chocolate then almond mousse.

You want the fillings to be higher than the top of the joconde. That way, when it's unmolded, your audience gets to see some of the mousse over the top. The whole thing goes in the fridge now for a few hours to set the mousse and chill.... When you are ready to glaze the top, heat some raspberry jam on the stove with a little apricot jelly, strain, cool slightly, then pour on top of the cold mousse and refrigerate to set.

You can decorate the top with fruit, chocolate shavings, nuts, or some kind of design or combination of these things.
I promised I'd share my lessons learned...
1.When cooling something in the oven, always remove from the oven once cool!
2.Dacquoise/meringue do not cut into circles!
3.Almond mousse is not easily made with almond paste. There's gotta be a better way, perhaps using almond extract to flavor. If you find one, let me know.
4.Plan ahead when layering your mousse. Make sure you know how much you have so that you have enough to make the layers you plan to make and have them all be the same thickness. If in doubt, make a double batch.
All in all, this was indeed a daring challenge. I brought the entremet to work and everyone loved it! (They didn't even have to know about the screw-ups.)
A joconde imprime (French Baking term) is a decorative design baked into a light sponge cake which lends an elegant finish to desserts formed in molds. A joconde batter is used because it bakes into a moist, flexible cake. The cake batter may be tinted or marbleized for a further decorative effect. You can even use color!
The joconde batter is spread very thinly and then baked on high heat for a short time. It must be watched carefully so that it stays flexible enough to fit into the molds. If under baked, it will be sticky. If over baked, it will dry out and crack. Once cooled, the sponge may be cut into strips to line any shape ring mold.
Entremet is a French term used to describe an ornate dessert with many different layers in a mold, usually served cold. Usually the layers are mousses or bavarians, but other components (such as meringue for crunch or gelee to add texture) can be added. A glaze often tops it off.
What a challenge it was! I have to say that this is the most "daring" thing I've baked since going to pastry school... I'll make sure to tell you about all of my screw-ups, as well as lessons learned (at the end), so you can hopefully learn from my mistakes.
The first part challenge was figuring out what flavors to use. Since the joconde itself is made from almond flour/meal, I decided to choose flavors that would compliment almond. Not too hard, since nearly everything tastes great with almond. Eventually, I decided on a base of dacquoise (a crunchy baked almond meringue), alternating layers of chocolate and almond mousse, along with a raspberry gelee layer in the very center. I used a raspberry glaze for the top.
Since the dacquoise takes the longest to prepare (it has to bake for 2 hours), I decided to make that first.
1 T unsalted butter, softened
1/4 cup all-purpose flour
1 cup almond meal
1/2 cup sugar
3/4 cup powdered sugar
4 large egg whites
Heat oven to 200 degrees. Line a baking sheet with parchment paper. Brush with 1 tablespoon butter; coat with flour. Set aside. Whisk together the almond meal, 1/4 cup sugar, and the powdered sugar; set aside. Beat the egg whites until they form soft peaks. One tablespoon at a time, slowly add remaining 1/4 cup sugar and continue to beat to stiff peaks. Fold in the nut mixture. Spread the mixture onto the prepared baking sheet until it is 1/4 inch thick. Bake the dacquoise 2 hours then turn off the oven, and leave inside until completely cooled, about 30 minutes.
Once this was done, I decided to make my gelee, since it too takes some time to set. A gelee, especially one spread this thinly, is a fancy word for what is basically a grown-up fruit roll-up.
Raspberry Gelee
1 1/2 tsp gelatin powder
1 T cold water
1 cup frozen raspberry
3/4 oz superfine sugar
Sprinkle the gelatin over the cold water to bloom. Cook raspberries and sugar on the stove to dissolve the sugar, then blend in a blender. (You can strain to remove the seeds, but I like 'em in there.) Heat the gelatin until liquid (careful, this happens fast!), then mix into the raspberries. Pour the mixture into your cake pan set over a piece of plastic wrap, then allow to set for at least 2 hours.

Once this was in the fridge setting, I decided to mix up my joconde batter and decor paste.
Joconde
3oz almond flour/meal
2⅔ oz confectioners' sugar
1 oz cake flour
3 large eggs
3 large egg whites
⅓ oz sugar
1 oz unsalted butter, melted
In a clean mixing bowl, whip the egg whites and sugar to firm, glossy peeks. In a separate bowl, sift almond flour, confectioner’s sugar, cake flour. On medium speed, add the eggs a little at a time. Mix well after each addition. Mix until smooth and light. Fold in one third reserved whipped egg whites to almond mixture to lighten the batter. Fold in remaining whipped egg whites. Do not over mix. Fold in melted butter.


Cocoa Joconde-Décor Paste
7 oz unsalted butter, softened
7 oz confectioner's sugar
7 large egg whites
6 oz cake flour
2 oz cocoa powder
Cream butter and sugar until light and fluffy. Add egg whites, beating continuously. Sift together flour and cocoa powder, then fold the mixture into the butter/sugar/egg mixture.
 For those of you who don't already know this about me, I never waste an egg white or a yolk. All those egg whites we just whipped up produced a bunch of egg yolks that can be used for something. And....guess what? Each batch of mousse filling requires 6 yolks. And, even if we weren't making mousse, we COULD make mousse or we could make ice cream. Or creme brulee. This list goes on. You probably have NO idea how easy any of these three things are to make.
 To make the joconde imprime (the "patterned joconde"), create a pattern out of decor paste, on a flat baking sheet with silicone mat. You can spread a thin layer of the decor paste and then use a spatula, decorating comb or even your finger to make a pattern. Or you can use a piping bag full of the decor paste to pipe your own design on the mat. Keep in mind the height of your mold and how wide your patterned strips are going to need to be. I decided to use the piping bag and piped designs similar to those that are usually done in melted chocolate. Once your design is finished, put the whole baking sheet in the freezer for about 15-30 minutes to harden up.

At this point, I decided to revisit my dacquoise and cut it to fit my entremet. What I didn't realize is that a rectangular meringue (this one anyway) is way too crisp to be cut into any kind of even-close-to-circular shape. So, when I tried, it basically just shattered into various sides shards of sugary, eggy, nutty goodness. I ate a few of the scraps, then tossed the rest in the trash and tried to decide what to do next. Hmmmm...I think I will make ANOTHER dacquoise, this time in the springform pan, so that when I remove it, it will be the perfect size/shape for the bottom of the cake. So, I set my joconde batter aside, left my patterned decor paste in the freezer, hardening, and whipped up another batch of that dacquoise. While it was in the oven for 2 MORE HOURS, I decided to take a break and go for a long run. So that I didn't have to wait for it to finish cooking, I asked Todd (my husband) to turn the oven off when the timer went off. One of the nice things about this dacquoise is that there really isn't any need to adjust baking time. After 2 hours, it's done, and it just cools in the hot oven. So, when I came back from my run, the pretty circular dacquoise was finished and cool in the oven. I decided to leave it there (***) and go take a shower. Ahhhhhhhhhhhhh, all clean. Well, at this point, the joconde batter I'd made HOURS ago was deflating (remember all those whipped egg whites that were folded in, as well as the melted butter? There is only so long that can sit, even in the fridge), so I decided to make another batch. When it was done, I cranked up the oven to 475 to preheat for my joconde, pulled the patterns out of the freezer and then...
I STOPPED. WHAT IS THAT SMELL? WHERE IS THAT SMOKE COMING FROM?
IT'S COMING FROM THE OVEN, inside which the pretty, circular dacquoise is still sitting. Burned to a *&$&*(# crisp at this point!!! I had completely forgotten to take it out before preheating my oven!!! Now, a second 2+ hour dacquoise ruined. I decided the entremet was going to have to go without.
Once I'd aired out the kitchen, I pulled the baking sheet with my patterned decor paste out of the freezer (it was nice and hard by now!) and spread a layer of the joconde batter on top . (Since the pattern is frozen hard, it shouldn't move at all.) Try to keep the joconde batter at a consistent height across the baking sheet, 1/4" is good. Bake in that hot, hot, 475 degree oven for 7-15 minutes, depending on the thickness of your batter. (Mine was fairly thin, so it baked on the lower end of that range.) Remove, cool slightly on the pan, and then quickly flip onto a kitchen towel or parchment paper sprinkled generously with powdered sugar. (This keeps the back of the cake from sticking.)

Once it's cooled a little more, trim the edges with a sharp knife (and a straight edge/ruler) to fit the inside of your mold. Remember, I used the springform pan (the kind you normally use to bake cheesecake in), so once it was cleaned of the blackened dacquoise, I went to prepare the pan. Place a piece of parchment paper on a solid surface (cookie sheet, cutting board, cookbook, whatever) and top with a piece of plastic wrap. Put your ring mold or springform pan on the plastic wrap and then snugly bring the plastic up the sides so that the bottom of the pan is taut. I also used a rubber band around the bottom edge to keep the plastic in place. Cut a piece of either parchment paper or acetate strip to line the inside of your pan. You probably should measure and cut it to be a little higher than the top of the pan, but then trim to the edge of the pan once it's lining the inside. This will help you smooth the top of your entremet.
Now, press your cut cake strips into the inside of the mold, decorative side facing out. Push and press the ends together so that the cake lining the mold is seamless. You don't want any of that yummy mousse and stuff sneaking out! If you want to cut a circle of joconde to press inside the middle to be the "bottom" of your entremet, you can do that now. I did decide to to do that since I didn't have any other plans for the bottom once dacquoise #2 got trashed.
Now, time to fill that thing! Remember above, I said I was filling with alternating layers of chocolate and almond mousse, as well as that grown-up fruit roll-up ("raspberry gelee") in the center. I whipped those mousses up in a snap and got to work filling that pan.
Chocolate Mousse
Place 12 oz chopped semisweet chocolate in a double-boiler (or a metal bowl set over a pan of simmering water). Add 4 oz butter. Careful not to scorch, melt the mixture until smooth. In another metal bowl, whip 6 egg yolks, add 3 oz sugar, an ounce or two of liquor if you want, and whisk over that pan of simmering water until it's almost too hot for you to stand it when you put your finger in. Move the metal bowl to a mixer and whisk on high until cool. (Since this takes a while, you might want to do that in your mixer bowl so you can just set it and forget it. For a few minutes.) When it's cool, it should be nice and thick. In a separate bowl, whip 1 pint (= 2 cups) of heavy cream to soft peaks. Fold the chocolate/butter mixture into the egg mixture, then gently fold in cream until no streaks remain. DO NOT OVERMIX or you will deflate. Refrigerate to set.
Almond Mousse
Now, I had never made almond mousse before, nor did I have a recipe. But, I did buy a really nice, gourmet, imported almond paste from Southern Season just for this occasion, so I had to ad lib. NOTE: It did not go as planned...Prepare the egg, sugar and liquor (if you want) mixture as above. For those of you taking notes, this is called a "sabayon" in French pastry terms. I tried softening the almond paste some by heating it in the microwave and then used a fork to try to soften it some more. When folding ingredients into each other for a mousse such as this, you really want the two components to be of similar consistency. This allows them to blend nicely. These two things did not blend nicely. The almond paste never got "smooth" and there were little chunks throughout the mixture. Plus, it was so much stiffer than the sabayon that I deflated a lot of it when mixing them. Once mixed, I folded in a pint of whipped cream (soft peaks) and refrigerated. Even though it had little almond paste chunks in it, it still tasted good!
To assemble, I spread a thin layer of chocolate mousse (about 1/2"), then almond mousse, then flipped the set gelee on top, then another layer each of chocolate then almond mousse.

You want the fillings to be higher than the top of the joconde. That way, when it's unmolded, your audience gets to see some of the mousse over the top. The whole thing goes in the fridge now for a few hours to set the mousse and chill.... When you are ready to glaze the top, heat some raspberry jam on the stove with a little apricot jelly, strain, cool slightly, then pour on top of the cold mousse and refrigerate to set.

You can decorate the top with fruit, chocolate shavings, nuts, or some kind of design or combination of these things.
I promised I'd share my lessons learned...
1.When cooling something in the oven, always remove from the oven once cool!
2.Dacquoise/meringue do not cut into circles!
3.Almond mousse is not easily made with almond paste. There's gotta be a better way, perhaps using almond extract to flavor. If you find one, let me know.
4.Plan ahead when layering your mousse. Make sure you know how much you have so that you have enough to make the layers you plan to make and have them all be the same thickness. If in doubt, make a double batch.
All in all, this was indeed a daring challenge. I brought the entremet to work and everyone loved it! (They didn't even have to know about the screw-ups.)
Monday, December 20, 2010
December Daring Baker's Challenge - Christmas Stollen
The 2010 December Daring Bakers’ challenge was hosted by Penny of Sweet Sadie’s Baking. She chose to challenge Daring Bakers’ to make Stollen. She adapted a friend’s family recipe and combined it with information from friends, techniques from Peter Reinhart’s book.........and Martha Stewart’s demonstration.
Before I get started, I'd like to talk a little bit about yeast. Since the heart of this challenge is the yeast, it might be nice for you non-bakers out there to understand it a little better. So, what do you know about yeast? Maybe you know it is a fungus. Did you know it is alive? Yeasts are single-celled organisms, the ones used in baking (and beer making) are called saccharomyces cerevisiae. Evidence of using yeasts for baking has been found dating back to ancient Egyptian days, but they weren't discovered to be living yeasts until 1857 when Louis Pasteur wrote a paper describing their actions. When you see yeast bubbling, it means that the yeast is emitting carbon dioxide. When yeasts feed (on sugar primarily), they give off C02, which is what makes the bubbles and also what makes breads rise. Yeasts get more active when they get warm, even more active when they get warmer and then eventually die when they get too hot (which is when the bread stops growing and keeps baking). Yeasts will slow down when cold, so that is why you sometimes see yeast stored in the refrigerator or freezer. Many yeasts breads can be kept in the refrigerator to rise slowly, thus developing even more flavor. Before yeast breads are baked, they go through a process called "proofing," which basically means that you have a period of time where you want the yeast to show you "proof" that it works, that is is alive and active. So, after rising, you punch the dough down to release the built up CO2, then set it somewhere warm to "proof" right before you bake. When proofing, you usually want to see the bread rise or grow in size. Proofing is best done at warm room temperature.
Before actually starting the stollen, I'm going to need to make the candied citrus peel. I have 5 beautiful oranges here at the house, so I'm going to make candied orange peel. I used a recipe by David Lebowitz to make the candied peel, first blanching the peel, then boiling it in a sugar syrup to just below the soft-ball stage.
Stollen Wreath
Makes one large wreath. Serves 10-12 people
Ingredients
¼ cup water (110º F)
1/2 oz active dry yeast
1 cup milk
5 oz unsalted butter
5½ cups flour
½ cup sugar
¾ teaspoon salt
1 teaspoon cinnamon
3 large eggs, lightly beaten
Grated zest of 1 lemon and 1 orange
2 teaspoons vanilla extract
1 teaspoon lemon extract or orange extract
¾ cup candied citrus peel
1 cup firmly packed raisins
3 tablespoons rum
1/4 cup dried cherries
1/2 cup dried cranberries
1 cup almond pieces
Melted unsalted butter for coating the wreath
Confectioners’ sugar for dusting wreath
Before you start, soak the raisins in a small bowl with the rum and set aside.
To make the dough, pour 1/4 cup warm water into a small bowl (water at 110 will be warm to the touch, but not scalding), sprinkle with the yeast and allow to stand for about 5 minutes. This softens the yeast enough to allow you to stir to dissolve. You should soon see that the yeast begins to bubble.

In a small saucepan, combine milk and butter over medium heat until the butter is melted. Let stand a few minutes to cool. In the meantime, lightly beat eggs in a small bowl and add citrus (I used lemon) and vanilla extracts.
In the large bowl of your stand mixer, stir together the flour, sugar, salt, cinnamon, orange and lemon zests. Then, on low, mix in (using the paddle attachment) the yeast/water mixture, eggs and the lukewarm milk/butter mixture. This should take about 2 minutes. It should be a soft, but not sticky ball. When the dough comes together, cover the bowl with a kitchen towel and let rest for 10 minutes. Add in the candied citrus peel, dried fruits and almonds and mix with your hands or on low speed to incorporate. On a lightly floured counter (or in the mixing bowl using a dough hook), knead the dough to distribute the fruit evenly.
This should take about 6-8 minutes. (A good way to tell when the dough is well blended is that some of the raisins on the outside will start to fall off the top of the dough because it is no longer sticky enough to hold them on.) Lightly oil a large bowl and transfer the dough to the bowl, rolling around to coat it with the oil. Cover the bowl with plastic wrap and put it in the refrigerator overnight (or up to a week) to rise slowly and develop flavor.
Be sure you allow yourself about 5 consecutive hours for the final portion. Once you are ready to bake, remove the dough from the refrigerator and allow it to rest at room temperature for 2 hours to warm slightly. Punch the dough down, dump it out of the bowl and onto the counter. Roll into a rectangle, approximately 16 x 24 inches. (It should be about 1/4" thick.)
Starting on one long side, begin rolling the dough into a 24" tightly rolled log.

Transfer the log to a parchment or silpat-lined sheet pan and join the ends together to make a circle. Use your fingers to pinch the ends together to join them well. Going around the circle, cut slashes about 2/3 way through approximately every 2 inches around the circle to resemble a wreath.
Set the wreath aside to "proof" for about 2 hours at warm room temperature. After this time, it should have expanded to about 1 1/2 times the original size. Bake in a 350 degree oven for 20 minutes, rotate the pan, then bake for another 20-30 minutes. When done, the top should be dark golden brown and the internal temperature register 190 degrees. Transfer to cooling rack and brush with melted butter while still warm. Sprinkle generously with powdered sugar. (This butter/sugar process can be repeated multiple times. Each coat protects the stollen and prolongs the freshness.)

This stollen travels easily, keeps well and is FANTASTIC toasted with a smear of butter. Even better still alongside a cup o' joe. We have been eating off of it for days and no one could resist. This may become a new holiday tradition in the Durham home!!
Before I get started, I'd like to talk a little bit about yeast. Since the heart of this challenge is the yeast, it might be nice for you non-bakers out there to understand it a little better. So, what do you know about yeast? Maybe you know it is a fungus. Did you know it is alive? Yeasts are single-celled organisms, the ones used in baking (and beer making) are called saccharomyces cerevisiae. Evidence of using yeasts for baking has been found dating back to ancient Egyptian days, but they weren't discovered to be living yeasts until 1857 when Louis Pasteur wrote a paper describing their actions. When you see yeast bubbling, it means that the yeast is emitting carbon dioxide. When yeasts feed (on sugar primarily), they give off C02, which is what makes the bubbles and also what makes breads rise. Yeasts get more active when they get warm, even more active when they get warmer and then eventually die when they get too hot (which is when the bread stops growing and keeps baking). Yeasts will slow down when cold, so that is why you sometimes see yeast stored in the refrigerator or freezer. Many yeasts breads can be kept in the refrigerator to rise slowly, thus developing even more flavor. Before yeast breads are baked, they go through a process called "proofing," which basically means that you have a period of time where you want the yeast to show you "proof" that it works, that is is alive and active. So, after rising, you punch the dough down to release the built up CO2, then set it somewhere warm to "proof" right before you bake. When proofing, you usually want to see the bread rise or grow in size. Proofing is best done at warm room temperature.

Before actually starting the stollen, I'm going to need to make the candied citrus peel. I have 5 beautiful oranges here at the house, so I'm going to make candied orange peel. I used a recipe by David Lebowitz to make the candied peel, first blanching the peel, then boiling it in a sugar syrup to just below the soft-ball stage.
Stollen Wreath
Makes one large wreath. Serves 10-12 people
Ingredients
¼ cup water (110º F)
1/2 oz active dry yeast
1 cup milk
5 oz unsalted butter
5½ cups flour
½ cup sugar
¾ teaspoon salt
1 teaspoon cinnamon
3 large eggs, lightly beaten
Grated zest of 1 lemon and 1 orange
2 teaspoons vanilla extract
1 teaspoon lemon extract or orange extract
¾ cup candied citrus peel
1 cup firmly packed raisins
3 tablespoons rum
1/4 cup dried cherries
1/2 cup dried cranberries
1 cup almond pieces
Melted unsalted butter for coating the wreath
Confectioners’ sugar for dusting wreath
Before you start, soak the raisins in a small bowl with the rum and set aside.
To make the dough, pour 1/4 cup warm water into a small bowl (water at 110 will be warm to the touch, but not scalding), sprinkle with the yeast and allow to stand for about 5 minutes. This softens the yeast enough to allow you to stir to dissolve. You should soon see that the yeast begins to bubble.

In a small saucepan, combine milk and butter over medium heat until the butter is melted. Let stand a few minutes to cool. In the meantime, lightly beat eggs in a small bowl and add citrus (I used lemon) and vanilla extracts.
In the large bowl of your stand mixer, stir together the flour, sugar, salt, cinnamon, orange and lemon zests. Then, on low, mix in (using the paddle attachment) the yeast/water mixture, eggs and the lukewarm milk/butter mixture. This should take about 2 minutes. It should be a soft, but not sticky ball. When the dough comes together, cover the bowl with a kitchen towel and let rest for 10 minutes. Add in the candied citrus peel, dried fruits and almonds and mix with your hands or on low speed to incorporate. On a lightly floured counter (or in the mixing bowl using a dough hook), knead the dough to distribute the fruit evenly.
This should take about 6-8 minutes. (A good way to tell when the dough is well blended is that some of the raisins on the outside will start to fall off the top of the dough because it is no longer sticky enough to hold them on.) Lightly oil a large bowl and transfer the dough to the bowl, rolling around to coat it with the oil. Cover the bowl with plastic wrap and put it in the refrigerator overnight (or up to a week) to rise slowly and develop flavor.
Be sure you allow yourself about 5 consecutive hours for the final portion. Once you are ready to bake, remove the dough from the refrigerator and allow it to rest at room temperature for 2 hours to warm slightly. Punch the dough down, dump it out of the bowl and onto the counter. Roll into a rectangle, approximately 16 x 24 inches. (It should be about 1/4" thick.)
Starting on one long side, begin rolling the dough into a 24" tightly rolled log.


Transfer the log to a parchment or silpat-lined sheet pan and join the ends together to make a circle. Use your fingers to pinch the ends together to join them well. Going around the circle, cut slashes about 2/3 way through approximately every 2 inches around the circle to resemble a wreath.
Set the wreath aside to "proof" for about 2 hours at warm room temperature. After this time, it should have expanded to about 1 1/2 times the original size. Bake in a 350 degree oven for 20 minutes, rotate the pan, then bake for another 20-30 minutes. When done, the top should be dark golden brown and the internal temperature register 190 degrees. Transfer to cooling rack and brush with melted butter while still warm. Sprinkle generously with powdered sugar. (This butter/sugar process can be repeated multiple times. Each coat protects the stollen and prolongs the freshness.)

This stollen travels easily, keeps well and is FANTASTIC toasted with a smear of butter. Even better still alongside a cup o' joe. We have been eating off of it for days and no one could resist. This may become a new holiday tradition in the Durham home!!
Wednesday, November 24, 2010
November Daring Baker's Challenge - Crostata!
In an attempt to make sure I don't get into a baking "rut" (If you call it a rut if I tend to always make chocolate or fruity layer cakes), I decided to rejoin the Daring Baker's group so that at least once a month I'd have a new baking challenge, proposed by someone other than myself. Getting back on this blog again will also hopefully help me to blog about some of my other desserts that I'm making. Just as a reminder, the purpose of this blog is for me to post pictures of some of the desserts I am making, as well as recipes and little scientific or baking-related "tidbits" that people will find interesting and explanatory.
The 2010 November Daring Bakers’ challenge was hosted by Simona of briciole. She chose to challenge Daring Bakers’ to make pasta frolla for a crostata. She used her own experience as a source, as well as information from Pellegrino Artusi’s Science in the Kitchen and the Art of Eating Well.
What is a Crostata? A crostata is an Italian baked dessert, like a "tart" or a pie. Typically, it's roughly shaped and the edges are folded over to give it a more rustic appearance. Typically they are filled with fruit jams or a combination of fresh fruit and pastry cream. If it were summer time, I would definitely have opted for a fresh fruit and pastry cream crostata, but because so many of the fall fruits are fantastic when roasted, I opted instead to make an autumn crostata of Apple, Pear and Quince.
Just to give some background on the quince, quince is a pome fruit related to apples and pears, native to Asia. Even when it is ripe, a quince is usually too hard and too sour to be eaten raw. A couple additional interesting tidbits about quince:
-Although the book of Genesis does not name the specific type of the fruit that Adam and Eve ate from the tree in the garden of Eden, some historians and ancient texts suggest that Eve's fruit of temptation might have been a quince
- Among ancient Greeks, the quice was a ritual offering at weddings
- Like apples, the seeds of the quince, if eaten in sufficiently large quantity can be broken down in the body to produce cyanide.
OK, now that you know that stuff, can we move on to the recipe? Sure. So, here we go.
For the base layer of the crostata, we were given several recipes from which to choose for "pasta frolla," which is a shortbread dough, like a pie dough, but uses eggs instead of cold water to bind the dough. As you can imagine, it is rich and delicious and, no matter how good that filling is, the *best* part of a crostata for many people. This is Simona's pasta frolla recipe, which is what I used. (Since I made an 11" tart, I used 1.5 times the recipe.)
Pasta Frolla
3 oz powdered sugar
8.25 oz AP flour
pinch salt
4 oz cold butter
zest from 1/2 lemon
1 egg + 1 egg yolk
To make, blend the sugar, flour and salt together in a mixing bowl, then cut the butter into small pieces and rub it into the dry ingredients until it has a coarse crumb. There can be a few larger, pea-sized pieces mixed throughout.

Make a well in the center and put in the lightly-beaten egg mixture (reserve a tablespoon or so to use for glazing the crust later).
Using a fork, pull the dry ingredients into the liquid and mix together until blended.

Shape into a ball and then flatten into a disk, wrap in plastic wrap and refrigerate until cold.

While the dough is chilling, roast the fruit.
3 ripe, but firm pears
3 firm apples (I used Fuji)
1 quince
1 stick of cinnamon
4 whole cloves
1/2 cup sugar
3 T lemon juice
2 T apple cider
1 T minced fresh ginger
Peel, core, quarter and then cut the fruits into about 1" sized pieces. Mix together with remaining ingredients and roast in a 375 degree oven for about an hour, mixing occasionally, until starting to caramelize. Remove from oven and cool.

Remove the crust, and roll out on a lightly-floured surface until it is a few inches larger in diameter than your pan. Lightly place in the pan and cut excess. You can decide whether you want the crust to roll over the top loosely, or whether you want to fit it to the edge of the tart pan. Put the crust in the pan back in the fridge to stay cool while you make the additional filling.
4 oz softened butter
1/2 c powdered sugar
1/2 c packed brown sugar
2 large eggs
1 t vanilla
1/4 c flour
Blend butter with sugars until light and fluffy. Add eggs, one at a time, then vanilla. Blend flour in last, only mixing until blended.
Remove crust from the fridge, pour in the filling, then top with the roasted fruit (including juices). If you have saved crust to fold over, go ahead and fold it over now. Brush the edges with the reserved egg, sprinkle with sugar and bake at 375 degrees on a preheated cookie sheet for 50-60 minutes until the filling has puffed up around the fruit and the edges of the crust are browned.

In case you weren't already thinking of it, this is EXCELLENT with a scoop of vanilla ice cream on the side. Buon Apetito!
Wednesday, October 29, 2008
October Daring Bakers Challenge - Pizzaiola!
October's challenge, brought to us by Rosa from Switzerland, is to make "real" pizza dough. The recipe is adapted from The Bread Baker's Apprentice, by Peter Reinhart. The original recipe makes 6 pizza crusts. I halved the recipe and made three, baking one right away and freezing the other two for another time. Each one of my pizzas measured to about 12-14" and was more than enough to feed 2 people for dinner, especially with a small salad on the side. I have made my own pizza dough before and I would say that, in comparison to other recipes, this one was not bad. I found it a little bland. With the right toppings, it can still be very tasty!

BASIC PIZZA DOUGH
4 1/2 Cups bread flour or all purpose flour, chilled
1 3/4 Tsp Salt1 Tsp Instant yeast
1/4 Cup Olive oil or vegetable oil (both optional, but it’s better with)
1 3/4 Cups water, ice cold (40° F/4.5° C)
1 Tb sugar
cornmeal for dustingTo get started, get yourself a nice, flat place to work. I have tiled countertops, so I use a board from Chef's Catalog. Then, mix the flour, salt and yeast together in the mixer bowl. Add the oil, sugar, and cold water and mix (using a large spoon or your dough hook) well to form a sticky ball of dough. Move this to a well-floured board and knead (THIS IS THE FUN PART!) using your hands (also well-floured) for about 5-7 minutes. It took me 10 minutes. Once you are done, your dough should be elastic and smooth.

The following day, about 2 hours before you plan to use your dough, remove it from the fridge and peel it out from the bag onto your lightly oiled and floured work surface. Using plenty of flour for your hands, the surface and the dough, press the dough into a round disk about 1/2" thick. Cover it with a towel or some plastic wrap and allow it to rest for about 2 hours.

After 2 hours rest, sprinkle the back side of a large baking sheet or jelly roll pan with durum/semolina flour or cornmeal and move the dough to your floured hands, keeping your fists rounded. Begin by stretching the dough in a circular motion with your hands. When you are comfortable, progress to a full TOSS! While you are doing this, if the dough sticks to your hands - FLOUR them! If the dough does not want to stretch or expand, it just needs a little more time to rest. Set it down for another 20 minutes and try again.
Once your pizza crust is the size you want it, place it on the back of your baking sheet, making sure there is enough flour or cornmeal to keep it from sticking. (You are going to want to be able to slide it off onto your pizza stone.)Top your pizza with the toppings of your choice and place the pan in the oven, or slide it off on to your preheated pizza stone. Bake at 500 for about 5-8 minutes and then begin checking. You want the crust to be cooked from the underside, but the cheese and toppings on top to be melted and hot.


Saturday, September 27, 2008
September Daring Bakers Challenge - Lavash....
...which is just a fancy word for crackers, really. This was fun!! I've never made crackers before, so this really was a new challenge.
Dough (makes 1 sheet pan of crackers)
1 1/2 c. bread flour
1/2 t. salt
1/2 t. instant yeast
1 T. agave syrup or sugar
1 T. vegetable oil
3-4 fl oz. water, room temperature

Pop the sheet into the oven and bake for about 20 minutes, just until the cracker is browning evenly across the top. Of course, if your dough is thicker, it might take a little longer. Remove the pan from the oven, let the crackers cool for about 10 minutes, then break (or snap on precut lines) them apart and serve!
I chose to serve my Cinnamon Sugar lavash with a Creamy White Peach dip. For the dip, I blended 2 cut peaches, 6 oz. plain yogurt (you can use soy yogurt for a vegan version), 2 T. brown sugar and about 1 t. lemon juice in a food processor. Serve, dip and enjoy!


Dough (makes 1 sheet pan of crackers)
1 1/2 c. bread flour
1/2 t. salt
1/2 t. instant yeast
1 T. agave syrup or sugar
1 T. vegetable oil
3-4 fl oz. water, room temperature
There are a few distinct steps to making any bread dough. To begin, you measure and mix the ingredients. The recipe I used just said to mix all ingredients together in a bowl, but I prefer to mix the dry and liquid ingredients separately and then add the liquids to the center of the dry and mix, adding more liquid as necessary. Also, I did not have instant yeast, so I found a conversion chart on the web and substituted 1/2 t. + 1/8 t. active dry yeast.
Once the dough is mixed into a ball, it needs to be kneaded for a while to develop the gluten. Gluten is the protein in wheat that develops when the dough is kneaded with some liquid. Some flours are naturally higher in protein content, like bread flour, and are more appropriate for forming an elastic dough. (As an aside, flours with less protein, like cake flour or even all-purpose flour, are usually used for cakes, cookies or pastries that you do not want to be tough or chewy. The instructions also usually indicate not to overmix the batter/dough.) It took me about 12 minutes to knead this dough to the appropriate texture. When it is ready, it should pass the "windowpane test" (google it!), be smooth, stretchy and somewhat firm. Form it into a nice ball, put it into a lightly oiled bowl, then cover with plastic wrap and set it in a warm (not hot!) place to rise.
Now it is time for the fermentation! This is the key to yeasted doughs! In a nutshell, rising / fermentation is when the LIVE yeasts are eating!! Specifically in this dough, the yeast, when combined with something sugar or agave and warmed, begins to feed. Yeast feeds best at a nice, warm temperature. Too hot and the yeasts die, too cold and they slow down or become dormant. Depending on the temperature of your kitchen, the fermentation process for this recipe will take about 90-120 minutes. You'll know it's ready when the dough has doubled in size and the plastic wrap is poofing out. A little more science here - the byproduct of yeasts feeding on sugar is carbon dioxide and alcohol. (Did you know that beer and wine are also produced by feeding yeasts?!?! Sure you did.)

Now, preheat the oven to 350 and mist your workspace lightly with oil. Transfer the dough to the workspace. With your fingers, gently form the blob into a square, lightly sprinkle some flour over the top and begin using a rolling pin to roll out the dough. You may have to stop periodically to let the dough rest or relax. Working the dough now has the same effect as when you kneaded it early. Too much working and you develop more gluten, which equals more elasticity, which means that your dough might not stay where you roll it to! Take a 5 minute break, come back and check again. You also might want to periodically lift the corners of your dough up and shake them out to stretch it more. The final size of your cracker will depend on how thin you've rolled it. I like a nice thin cracker, so I kept going until it was almost translucent. Once the cracker is rolled out, gently move it to a parchment-lined baking sheet. If you want cut or shaped crackers, you can use a rolling blade or pizza cutter to precut the dough. You do not need to separate it, as it will snap apart after baking. If you want rough shards, just leave the sheet whole. The creators of this month's challenge allowed us the option of choosing our own toppings and our own dip or salsa. I decided to go with a sweet cracker and lightly misted the top with water, then sprinkled raw sugar, cinnamon and vanilla powder. Alternatively, you could use seeds, other spices, sea salt, cracked pepper, etc. to make a savory cracker. You can also make stripes or designs across your crackers to give them a more colorful look.
Pop the sheet into the oven and bake for about 20 minutes, just until the cracker is browning evenly across the top. Of course, if your dough is thicker, it might take a little longer. Remove the pan from the oven, let the crackers cool for about 10 minutes, then break (or snap on precut lines) them apart and serve!
I chose to serve my Cinnamon Sugar lavash with a Creamy White Peach dip. For the dip, I blended 2 cut peaches, 6 oz. plain yogurt (you can use soy yogurt for a vegan version), 2 T. brown sugar and about 1 t. lemon juice in a food processor. Serve, dip and enjoy!


Saturday, July 26, 2008
July Daring Bakers Challenge - Filbert Gateau with Praline Buttercream
I'm making plenty of desserts these days, but not branching out as often as I'd like. I joined the Daring Bakers in order that I might get at least ONE new challenge each month and write about it. For my first month's challenge, we were to make the Filbert Gateau with Praline Buttercream from Carole Walter's Great Cakes. This cake has several components - the Hazelnut Genoise ("the cake"), a sugar syrup (for soaking - genoise is a fairly dry cake and typically gets soaked to make it moist and provide flavor), Praline Buttercream, Apricot Glaze, and Ganache. I made the cake first, following the recipe exactly. My only change was to use two 9" pans (instead of one 10" pan). I filled them evenly and then torted each one, making my final cake 4 layers instead of 3. (This is my favorite size cake, plus it fits my cake boards and cake carrier.)
Filbert Genoise
1 1/2 c. toasted, skinned hazelnuts (also called filberts!)
2/3 c. unsifted cake flour
2 T. cornstarch
7 large yolks
1 c. superfine sugar, divided (buzz regular sugar w/food processor for 10 sec)
1 t. vanilla (never use imitation!)
1/2 t. lemon zest
5 large egg whites
1/4 c. warm (100-110) clarified butter
Remember to start with the mise en place. Get all of your ingredients, tools and equipment (food processor, bowls, saucepan, measuring cups) together. If you have to prepare the nuts or the clarified butter*, do so now. Preheat the oven to 350. Buzz the nuts, flour and cornstarch in the food processor for 30 seconds, then pulse until ground. Don't overdo this step, or you'll release too many of the oils in the nuts and end up with a pasty mess!
Beat the yolks until thick and lightened (3-4 minutes on medium-high), then add 3/4 c. sugar, slowly and continue to beat until ribbony. Blend in vanilla and zest. Next, whip the whites to soft peak. Slowly add the remaining sugar and whip about 30 seconds longer. Add the yolks to the whites and whip together for about a minute. Remove from mixer and add in dry ingredients ("nut meal") by sifting over (about 2 tablespoons at a time) with a medium strainer, folding carefully. When about 2 T of nut meal remains, pour the warm butter into the batter in a steady stream. Quickly fold in the remaining nut meal, taking about 15 turns. All of this folding should take you about 50 turns or so with a wide spatula. Since this cake has no chemical leavener (this is one of the hallmarks of a genoise cake - did you notice??), the whipped yolks and whites need to retain air in order to allow the mixture to rise some.
Pour batter into greased and floured pan(s), tap once on the counter to remove any bubbles, then bake for about 30 minutes. The cake is done when it springs back to the touch and pulls from the sides of the pan. Remove, cool slightly in pan, then invert on well-sprayed cooling rack.
*To skin hazelnuts , bake in a single layer on a cookie sheet in 325 oven for about 10-12 minutes, then rub them between a dish towel while hot. Remaining nuts can be reheated again if you need to. To clarify butter, place the amount you need PLUS about 25% more in the microwave in 30 second intervals on medium power. Alternatively, you can do this slowly over the stove. Once the butter separates into distinct layers, skim foam from the top. Pour off clear liquid butter into a fine sieve, taking care not to let any milk solids from the bottom come through.
To answer that big question that many of you inevitably are dying to ask - I don't know how important it is in this recipe to clarify the butter. The main purpose in removing milk solids and water in butter is to allow it to be heated to a higher temperature without burning. Clarifying butter slowly over gentle heat also helps it to develop flavor. Feel free to try it without clarifying the butter. IMO, it probably does not matter much in this recipe.
Simple syrup
1 c. water
1/4 c. sugar
2 T liquer, like Grand Marnier or Rum (optional)
Boil water and sugar, remove from heat and add liquer when cool. Rewarm to use.
For the buttercream, I made my own recipe, Italian Meringue Buttercream, instead of the recipe's Swiss Meringue Buttercream. With Italian Meringue, a sugar syrup is cooked to about 240-250 degrees (soft-firm ball stage) and then poured over whipping egg whites. With a Swiss Meringue, the whites are combined with the sugar and then whipped together over heat to about 120 degrees. I find the Italian method makes a more stable buttercream, so it's what I prefer to use.
Praline Buttercream
4 egg whites (or about 4 ounces)
1 c. sugar (or about 6-8 ounces)
pinch of salt
2-3 sticks of room temp butter, cut into chunks (start with 2 sticks)
1/3 c. praline paste
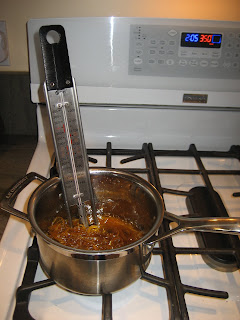
Place sugar in a saucepan over high heat with enough water to make a thick slurry. (It doesn't matter how much water you add because it will evaporate away as it boils. The more you add, the longer this step will take.) Put your whites in the mixer bowl with a pinch of salt and begin whipping on medium speed. Boil the sugar water until it reaches about 240. You can also look for visual clues - the bubbles on top will get bigger and slow down a lot. Like this:

One of these days, I'll show you a really cool trick for testing sugar stage. :)
You need to keep an eye on your whites while the sugar is coming up to temp. If they start to develop firm peaks, slow or stop the mixer until your sugar syrup is ready. When the sugar syrup is ready, make sure the whites are whipping at medium-high and SLOWLY pour the hot syrup down the side of the bowl.

Whip until cool (less than 100), then add your butter, piece by piece. Add in the praline paste. (If you can't find this, I bet you can use Nutella, which is a chocolate praline paste. YUM!) Since praline paste isn't very "stiff," you may need to add a little more butter in order to get the consistency and texture of your final buttercream where you want it.
Now that I've said all of that, here is a great EASY recipe to make Italian meringue buttercream. Following the steps above, use x amount of egg whites, 2x ounces of sugar and 2-3x ounces of butter. Another helpful tip is that 1 cup of sugar weighs about 7 ounces. Don't get too worked up over it. Just remember - x + 2x + 2-3x. For example, if x=4 egg whites, then 2x (sugar) is 8 ounces, or just over 1 cup. Butter is between 8 ounces (2x) and 12 ounces (3x). Or don't, and just pull up this blog!
Apricot Glaze
2/3 c. apricot preserves
1 T. water
Combine and heat to slow simmer. Remove from heat and strain out chunks. Thin if you want and rewarm slightly before using.
Ganache
6 ounces chocolate, chopped or chips
6 ounces heavy cream
1 T light corn syrup (optional)
1 T liquer (optional)
1 T water (optional)
Combine cream and corn syrup, bring just to a boil, then pour over chocolate. Whisk smooth after about a minute. Add liquer (optional) and water, if necessary. Cool to about body temperature (when you dip your finger in, you feel neither hot nor cold).
Cake Assembly
To assemble the cake, torte the cooled layer(s) as you wish. As I said above, I made two 9" layers and cut them each in half. (Torting simply refers to cutting a cake into more than one layer.) Place the bottom layer on your cake board, moisten with a few tablespoons of syrup, letting it soak in for a few minutes, then spread with about 1/4 of the buttercream. Continue stacking the layers, moistening each one with syrup before spreading with buttercream. Moisten the top of the cake with syrup, let it soak in and then pop the whole thing in the fridge (at least 30 min) or the freezer (10 min) to chill. Remove chilled cake and use a serrated knife to trim the sides perfectly straight. You can also give the top edge a slight bevel to allow the glaze to drip over the edge. Brush the top and sides of the cake with the glaze, sealing all of the cut areas. Chill in fridge while preparing the ganache.

When I'm covering a cake with ganace glaze, I always put it on a cake board that is exactly the same size as my cake, so that glaze can drip off without getting the board all messy. Then, when you are done, you can just pop the whole thing on another, larger, fancy (if you want!!) cake board. That said, place the whole cake on a cake rack set on top of a bowl that is at least an inch or two wider in diameter than your cake. When the ganache glaze has cooled some, pour it over the cake, starting in the middle and pouring until glaze goes down the sides. If you want to completely cover the cake, make sure you quickly check all of the sides and the back to see that the glaze has gotten everywhere. It's important to do this quickly because the chocolate will cool as it touches the chilled cake. Once you are done glazing, let the cake sit on the rack for a few minutes, then carefully lift using a spatula under the board. Place on your larger board or serving plate.
All of the above being said, I only had about 4 ounces of cream, so I skimped on the ganache and ended up running out before the cake was covered. So, I chilled the whole mess and then reworked it using a warm spatula over the cake. If you'd rather not pour the glaze, alternatively, you can chill the ganache, whip it with a mixer and spread it over the top of the cake. Nothing compares, though, to the fanciness of a ganache glazed cake!
You can decorate the cake however you want, using whipped ganache or the leftover praline buttercream. You can use chopped, toasted hazelnuts or candied hazelnuts for dramatic effect. I chose to use the praline buttercream for a shell border around the bottom and a decorative design on top.


Oh, and, most importantly, ENJOY!!!! YUM!
Filbert Genoise
1 1/2 c. toasted, skinned hazelnuts (also called filberts!)
2/3 c. unsifted cake flour
2 T. cornstarch
7 large yolks
1 c. superfine sugar, divided (buzz regular sugar w/food processor for 10 sec)
1 t. vanilla (never use imitation!)
1/2 t. lemon zest
5 large egg whites
1/4 c. warm (100-110) clarified butter
Remember to start with the mise en place. Get all of your ingredients, tools and equipment (food processor, bowls, saucepan, measuring cups) together. If you have to prepare the nuts or the clarified butter*, do so now. Preheat the oven to 350. Buzz the nuts, flour and cornstarch in the food processor for 30 seconds, then pulse until ground. Don't overdo this step, or you'll release too many of the oils in the nuts and end up with a pasty mess!
Beat the yolks until thick and lightened (3-4 minutes on medium-high), then add 3/4 c. sugar, slowly and continue to beat until ribbony. Blend in vanilla and zest. Next, whip the whites to soft peak. Slowly add the remaining sugar and whip about 30 seconds longer. Add the yolks to the whites and whip together for about a minute. Remove from mixer and add in dry ingredients ("nut meal") by sifting over (about 2 tablespoons at a time) with a medium strainer, folding carefully. When about 2 T of nut meal remains, pour the warm butter into the batter in a steady stream. Quickly fold in the remaining nut meal, taking about 15 turns. All of this folding should take you about 50 turns or so with a wide spatula. Since this cake has no chemical leavener (this is one of the hallmarks of a genoise cake - did you notice??), the whipped yolks and whites need to retain air in order to allow the mixture to rise some.
Pour batter into greased and floured pan(s), tap once on the counter to remove any bubbles, then bake for about 30 minutes. The cake is done when it springs back to the touch and pulls from the sides of the pan. Remove, cool slightly in pan, then invert on well-sprayed cooling rack.
*To skin hazelnuts , bake in a single layer on a cookie sheet in 325 oven for about 10-12 minutes, then rub them between a dish towel while hot. Remaining nuts can be reheated again if you need to. To clarify butter, place the amount you need PLUS about 25% more in the microwave in 30 second intervals on medium power. Alternatively, you can do this slowly over the stove. Once the butter separates into distinct layers, skim foam from the top. Pour off clear liquid butter into a fine sieve, taking care not to let any milk solids from the bottom come through.
To answer that big question that many of you inevitably are dying to ask - I don't know how important it is in this recipe to clarify the butter. The main purpose in removing milk solids and water in butter is to allow it to be heated to a higher temperature without burning. Clarifying butter slowly over gentle heat also helps it to develop flavor. Feel free to try it without clarifying the butter. IMO, it probably does not matter much in this recipe.
Simple syrup
1 c. water
1/4 c. sugar
2 T liquer, like Grand Marnier or Rum (optional)
Boil water and sugar, remove from heat and add liquer when cool. Rewarm to use.
For the buttercream, I made my own recipe, Italian Meringue Buttercream, instead of the recipe's Swiss Meringue Buttercream. With Italian Meringue, a sugar syrup is cooked to about 240-250 degrees (soft-firm ball stage) and then poured over whipping egg whites. With a Swiss Meringue, the whites are combined with the sugar and then whipped together over heat to about 120 degrees. I find the Italian method makes a more stable buttercream, so it's what I prefer to use.
Praline Buttercream
4 egg whites (or about 4 ounces)
1 c. sugar (or about 6-8 ounces)
pinch of salt
2-3 sticks of room temp butter, cut into chunks (start with 2 sticks)
1/3 c. praline paste
Place sugar in a saucepan over high heat with enough water to make a thick slurry. (It doesn't matter how much water you add because it will evaporate away as it boils. The more you add, the longer this step will take.) Put your whites in the mixer bowl with a pinch of salt and begin whipping on medium speed. Boil the sugar water until it reaches about 240. You can also look for visual clues - the bubbles on top will get bigger and slow down a lot. Like this:

One of these days, I'll show you a really cool trick for testing sugar stage. :)
You need to keep an eye on your whites while the sugar is coming up to temp. If they start to develop firm peaks, slow or stop the mixer until your sugar syrup is ready. When the sugar syrup is ready, make sure the whites are whipping at medium-high and SLOWLY pour the hot syrup down the side of the bowl.

Whip until cool (less than 100), then add your butter, piece by piece. Add in the praline paste. (If you can't find this, I bet you can use Nutella, which is a chocolate praline paste. YUM!) Since praline paste isn't very "stiff," you may need to add a little more butter in order to get the consistency and texture of your final buttercream where you want it.
Now that I've said all of that, here is a great EASY recipe to make Italian meringue buttercream. Following the steps above, use x amount of egg whites, 2x ounces of sugar and 2-3x ounces of butter. Another helpful tip is that 1 cup of sugar weighs about 7 ounces. Don't get too worked up over it. Just remember - x + 2x + 2-3x. For example, if x=4 egg whites, then 2x (sugar) is 8 ounces, or just over 1 cup. Butter is between 8 ounces (2x) and 12 ounces (3x). Or don't, and just pull up this blog!
Apricot Glaze
2/3 c. apricot preserves
1 T. water
Combine and heat to slow simmer. Remove from heat and strain out chunks. Thin if you want and rewarm slightly before using.
Ganache
6 ounces chocolate, chopped or chips
6 ounces heavy cream
1 T light corn syrup (optional)
1 T liquer (optional)
1 T water (optional)
Combine cream and corn syrup, bring just to a boil, then pour over chocolate. Whisk smooth after about a minute. Add liquer (optional) and water, if necessary. Cool to about body temperature (when you dip your finger in, you feel neither hot nor cold).
Cake Assembly
To assemble the cake, torte the cooled layer(s) as you wish. As I said above, I made two 9" layers and cut them each in half. (Torting simply refers to cutting a cake into more than one layer.) Place the bottom layer on your cake board, moisten with a few tablespoons of syrup, letting it soak in for a few minutes, then spread with about 1/4 of the buttercream. Continue stacking the layers, moistening each one with syrup before spreading with buttercream. Moisten the top of the cake with syrup, let it soak in and then pop the whole thing in the fridge (at least 30 min) or the freezer (10 min) to chill. Remove chilled cake and use a serrated knife to trim the sides perfectly straight. You can also give the top edge a slight bevel to allow the glaze to drip over the edge. Brush the top and sides of the cake with the glaze, sealing all of the cut areas. Chill in fridge while preparing the ganache.

When I'm covering a cake with ganace glaze, I always put it on a cake board that is exactly the same size as my cake, so that glaze can drip off without getting the board all messy. Then, when you are done, you can just pop the whole thing on another, larger, fancy (if you want!!) cake board. That said, place the whole cake on a cake rack set on top of a bowl that is at least an inch or two wider in diameter than your cake. When the ganache glaze has cooled some, pour it over the cake, starting in the middle and pouring until glaze goes down the sides. If you want to completely cover the cake, make sure you quickly check all of the sides and the back to see that the glaze has gotten everywhere. It's important to do this quickly because the chocolate will cool as it touches the chilled cake. Once you are done glazing, let the cake sit on the rack for a few minutes, then carefully lift using a spatula under the board. Place on your larger board or serving plate.
All of the above being said, I only had about 4 ounces of cream, so I skimped on the ganache and ended up running out before the cake was covered. So, I chilled the whole mess and then reworked it using a warm spatula over the cake. If you'd rather not pour the glaze, alternatively, you can chill the ganache, whip it with a mixer and spread it over the top of the cake. Nothing compares, though, to the fanciness of a ganache glazed cake!
You can decorate the cake however you want, using whipped ganache or the leftover praline buttercream. You can use chopped, toasted hazelnuts or candied hazelnuts for dramatic effect. I chose to use the praline buttercream for a shell border around the bottom and a decorative design on top.


Oh, and, most importantly, ENJOY!!!! YUM!
Subscribe to:
Posts (Atom)